Regular cleaning of sauna benches with a soft brush and mild sauna cleaner, and annual protection with paraffin oil are key to maintaining their beauty and hygiene. The single most effective action is the use of a tablecloth every time you take a sauna, which effectively protects the wooden surface from carbon and dirt.
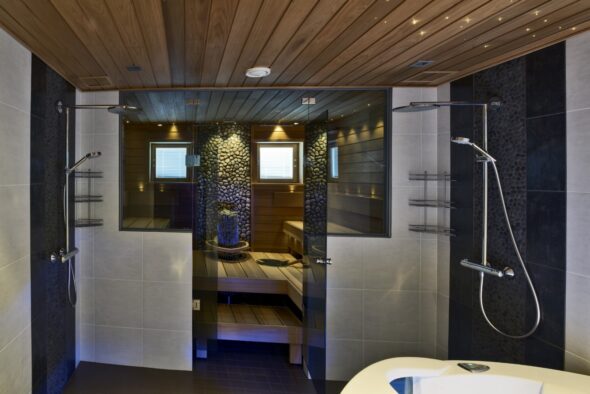
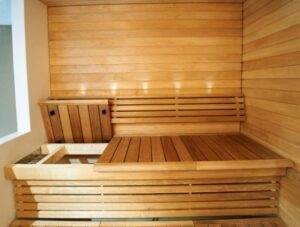
You enter the sauna, where the scent of clean wood and the warmth invite you to relax. A key part of this enjoyable experience is the clean and well-maintained decks. They are not just a seat, but the heart of the sauna, in direct contact with your skin. High quality sauna benches are an investment that deserves the care it deserves. Not only does it ensure their longevity, but it also ensures that every sauna session is clean and safe.
However, many sauna owners wonder how to properly care for their boards so that they retain their beautiful surface and hygiene. Fortunately, it’s easier than you think. It’s all about a few simple routines that will make a big difference and keep your tile looking inviting year after year. We’ll walk you through clear, practical tips to ensure your sauna decks are in the best possible condition.
Regular cleaning: the basis for a long life of decking
Regular cleaning is the most effective way to keep your sauna floor hygienic and beautiful. It removes dirt and sweat that has come loose from the skin, preventing it from sticking to the wood. When made a regular habit, cleaning is a quick and effortless procedure that rewards the user with a fresh and clean sauna.
What do you need for cleaning?
With the right tools, the work is easy and gentle without damaging the wood surface. You don’t need a big arsenal, just a few basics:
- A soft brush or sponge: Choose a brush with bristles that won’t scratch the surface of the wood. A root brush is often too hard.
- Cool and fresh water: cool or lukewarm water is best for wood.
- Mild detergent for sauna: avoid strong all-purpose cleaners or chlorine-based substances that can damage and discolour wood. Pine soap, for example, is traditional, but care should be taken when dosing it.
Cleaning step by step
Follow these simple steps and you’re sure to succeed:
- Water the decking: first rinse the decking with warm water. First, warm the lawns with warm water.
- Prepare the detergent solution: dilute the sauna cleaner in a bucket according to the instructions on the packaging. Remember that less is often more.
- Gently brush: dip the brush in a detergent solution and brush the entire length of the decking in the direction of the wood’s grain. This is the most effective cleaning and the gentlest way to treat the wood surface.
- Rinse thoroughly: rinse the tiles with plenty of cool water until all the detergent has been removed. Poor rinsing can leave spots on the surface.
- Dry and ventilate: the spatula allows you to remove excess water from the surface of the decking. If possible, lift the top board up and leave the sauna door open to allow air to circulate and the boards to dry properly. Good ventilation is key to preventing mould and odours.
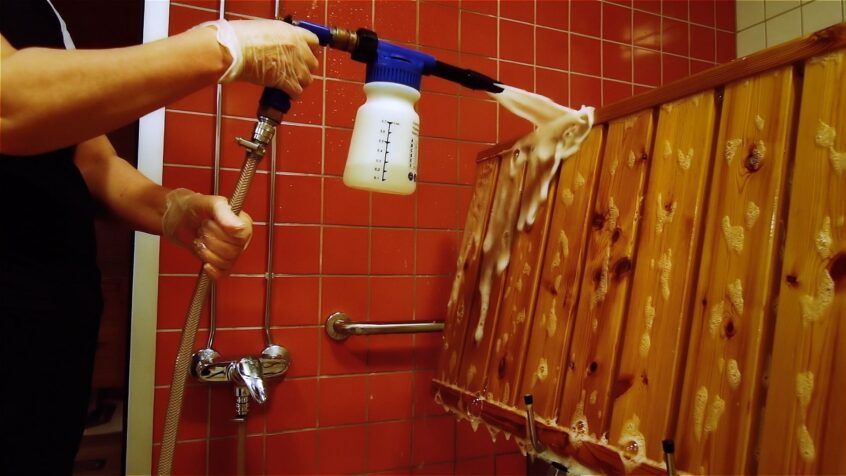
Important reminder: do not use a pressure washer!
Although a pressure washer may seem like an attractive and effective solution, it is strictly forbidden to use it for cleaning sauna ceilings. The high pressure breaks the soft surface of the wood, making it sticky and more prone to collecting dirt. Gentle brushing is always the best and safest method.
Power cleaning and stain removal: when basic cleaning is no longer enough
Sometimes regular washing doesn’t quite get all the dirt that has accumulated, or individual stains appear on the tiles. Not to worry – these are common challenges for which there are effective and safe solutions. More thorough cleaning will restore your sauna tiles to their original glory and prepare them for protective treatment.
When is it time for an intensive cleaning?
A deep cleaning should be done about once a year, or if the sauna has been used sparingly and needs some maintenance. Even if you notice that the surface of the tiles is looking soft or if you see obvious darkening, it’s time to take action.
Removal of stubborn dirt and stains
Before resorting to sandpaper, try targeted cleaning methods. Always remember to try the cleaner on an inconspicuous area first, such as the underside of the trowel.
The most common stains and their treatment:
- Grease and sweat stains: use an alkaline, heavy-duty cleaner for decks. Apply the product, allow it to work for a short time according to the manufacturer’s instructions and then brush the surface thoroughly in the direction of the wood grain. Rinse very well.
- Stearin: Allow the stearin to cool and harden completely. Allow the stearin to cool and then gently scrape most of it off with a tool that won’t scratch the wood, such as a plastic spatula. Place absorbent paper (e.g. kitchen paper or a filter bag) over the remaining stain and heat it on low heat with an iron. The paper will absorb the melted stearin.
- Dark spots and mould: if dark spots have appeared on the ceilings, they may be a sign of inadequate ventilation. Use a disinfectant sauna cleaner or a special mould remover that is safe for sauna wood surfaces. Follow the instructions for use carefully and ensure good ventilation during and after treatment.
Last resort: sanding the plates
If stains are deeply embedded in the wood or the surface has become rough over time, light sanding is an effective way to completely renew your sauna ceilings. Sanding removes a thin layer from the surface of the wood, revealing a new and clean wood surface underneath.
- Choose the right grit: start with fine sandpaper with a grit of around 120-180. This is usually sufficient for removing stubborn dirt and small scratches.
- Sand gently: always sand in the direction of the grain of the wood. Smooth, even strokes produce the best results.
- Clean the dust: after sanding, vacuum and wipe all sanding dust off the benches and the entire sauna area with a lint-free cloth. Dust must be removed before the next step.
- Remember the protective treatment: sanding opens the pores of the wood, so it is absolutely essential to protect it after treatment. After cleaning, apply paraffin oil or other wood preservative to the boards.
Wood protection and surface treatment: oil, wax or something else entirely?
Once the sauna ceilings have been cleaned and possibly sanded, it’s time to give them the final, but most important, finishing touch: a protective treatment. This step is like putting on a raincoat – it not only keeps the wood looking beautiful, but actively protects it from moisture and dirt. The treated surface repels water and sweat, making future clean-ups much easier and significantly extending the life of the decking.
Paraffin oil: a reliable and safe basic choice
By far the most popular and recommended substance for protecting decks is paraffin oil. It is a colourless, odourless and non-toxic natural product that is perfectly safe to use in hot and humid conditions in the sauna.
- How does it work? The oil penetrates deep into the pores of the wood and saturates the surface, preventing the absorption of dirt and moisture.
- What does it do to your appearance? Paraffin oil beautifully deepens the wood’s own natural shade and enhances its grain pattern without changing its colour. It makes the surface silky smooth and pleasant to the touch.
- Who is it for? For anyone who wants an easy, effective and traditional way to protect their decking and respect the natural beauty of wood.
What are the other options?
There are also other products on the market that can be used on decking, such as tinted decking coverings and sauna waxes. They offer possibilities to personalise the look of your sauna.
- Tinted paint protectors: these are often paraffin oil-based products with added pigment. They can be used to treat ceilings to a white sound, an elegant grey or a deep black, for example.
- Sauna waxes: the wax forms a thin, breathable and dirt-repellent film on the surface of the wood. Like oils, waxes are available in both untinted and tinted versions.
Important note: What should never be used for decking
Never treat sauna boards with ordinary varnishes, paints or wood preservatives intended for outdoor use. They form a dense, unbreathable film that heats up in the sauna to a scorching temperature, can release harmful fumes and eventually crack and flake off under harsh conditions.
How to do it right – step by step
The best way to deal with a shield is to follow a few basic guidelines. Take a few moments to work calmly and allow the substances to soak in properly.
- Make sure the starting point: the plates must be completely clean and absolutely dry. Make sure that the boards must be absolutely clean and completely dry.
- Apply the substance: apply the paraffin oil or other protectant of your choice thinly and evenly with a clean, lint-free cloth, sponge or brush. Apply one board at a time, working along the grain of the wood.
- Allow to absorb: leave the oil to soak in for about 30-60 minutes. Heat-treated wood may require a longer absorption time.
- Wipe away the excess: this is a critical step! Thoroughly wipe off any unabsorbed oil from the surface with a dry, clean cloth. Dry and dry the surface with a dry cloth and dry cloth to remove any excess oil.
- Allow to dry and ventilate: leave the boards to dry in peace until the next day before heating the sauna. Remember also to dispose of oily rags safely, as they can spontaneously combust. The rags may burn themselves if they are left unattended.
The most common mistakes in decking – and how to avoid them
Even the best intentions can sometimes lead to mistakes that shorten the life or degrade the appearance of your decking. Fortunately, the most common stumbling blocks are easy to avoid once you recognise them. With the right methods and tools, you can ensure that a quality sauna ceilings will serve you flawlessly year after year.
Avoid these common stumbling blocks
We will go through three typical mistakes to keep in mind.
- Too strong a grip: the biggest mistake is to use a pressure washer or a hard root brush. Although they may seem effective, they break the soft surface layer of the wood. The end result is a spotty and more porous surface that is more prone to trapping dirt. Chlorine and other aggressive detergents are also toxic to decking – they can cause permanent discolouration.
- Incorrect finish: varnish, paint or outdoor wood preservative does not belong in the sauna. These substances form a dense film that prevents the wood from breathing. In the heat of a sauna, the surface can become scorching hot, crack and release harmful compounds into the air. Always use only oils or waxes intended for use in the sauna.
- Failure to rinse and dry: detergent residues must always be rinsed off very thoroughly with cool water. If detergent remains on the surface, it may leave spots as it dries. It is equally important to ensure effective drying after washing. Leave the sauna door open and, if possible, lift the bottom shelf up to allow air to circulate throughout. A damp sauna is a breeding ground for mould and unpleasant odours.
Main individual treatment: use of a tablecloth
If you had to name one single thing you like about sauna ceilings in the best possible condition, it would be this: always use a tablecloth. It’s the simplest, cheapest and most effective way to protect your wooden surface. A tea towel absorbs dirt and grime that would otherwise be absorbed directly into the wood. Not only is its use hygienic, it is also a tribute to quality materials and to the sauna tradition itself. It significantly reduces the need for cleaning and extends the service life of the decks.
Advice from a Sun Sauna expert
Remember that regular and gentle care is always better than one big, heavy cleaning job once a year. By making it a routine to wipe down and air out the decks after each sauna session, you’ll keep problems at bay and your sauna will always be invitingly clean and ready for your next relaxing soak.
Bring your ideas to life – try our free design tool and design the sauna of your dreams